Category Archives: Raspberry Pi

Raspberry Pi Round Two: PiMame

In the comments of my last Raspberry Pi post, reader Ben politely pointed out “you’re doing it wrong.” And I was. Along with a couple of other helpful suggestions, Ben also pointed me toward PiMame, which comes as a precompiled image — simply download, extract, boot, and play. Now that the raspberry Pi is out of the box and connected, I only had two goals:

01. Download/extract/configure PiMame
02. Play games.

Would this one work better than my first go ’round with RetroPie? Read on!

01. Download/extract/configure PiMame

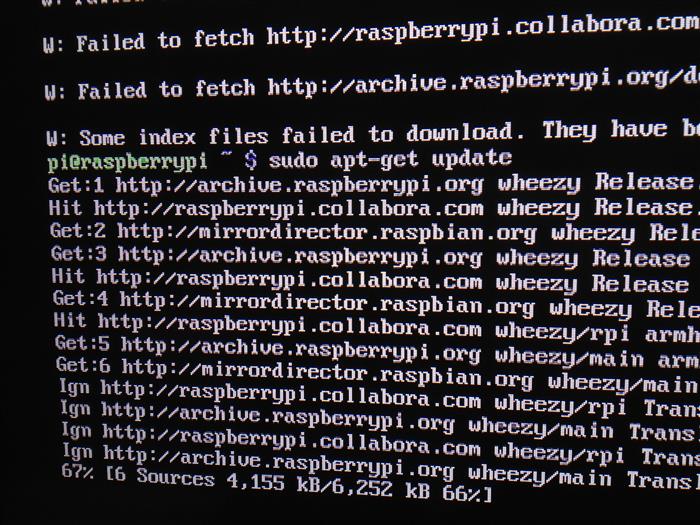
I downloaded PiMame 0.7.8 from the following link: http://blog.sheasilverman.com/pimame-raspberry-pi-os-download/. I used Win32 Disk Imager to write the IMG file to a 4gb SD card. I pulled the SD card out of my PC, inserted it into the Pi, applied power and got the following:

So far, so good! On to step two.

02. Play games.

Using WinSCP I connected to the Pi over my network and copied the Mario Bros ROM for MAME over into the ROMs directory. I rebooted the Pi, selected MAME, and there was Mario Bros. I chose that, and got this:

Honest to goodness, that’s all there was to it. It even recognized my USB gamepad with no additional configuration. The biggest initial problem I had to overcome was the fact that there was no sound coming out of my television. Unmuting my television fixed that.

For the most part I’d say I’m pleased with PiMame. The sound is not 100% accurate but it’s certainly playable. I thought the samples sounded low in Shinobi and some of the explosions were missing in Galaga, but the thing played just fine. PiMame comes with a ton of other emulators so I’ll be experimenting with those as well.

My next Raspberry Pi project will be a hardware one, not a software one. I detest the case that came with this thing and so I’ve had my eye out for something else to use, even if it’s temporary. I had Raspberry Pi on the brain the other day at Big Lots and ran across this.

Now, where did I put that Dremmel…

A Slice of RetroPie

Last weekend I started my first Raspberry Pi project. After reading that several people have turned their Raspberry Pies into emulation machines, I searched Google and found RetroPie, a pre-built image for the Raspberry Pi containing a ton of pre-loaded emulators.

At the start of the project I had three clear goals:

01. Power up the Raspberry Pi.
02. Install RetroPie
03. Play some games!

How did things turn out? Read on!

01. Power up the Raspberry Pi.

This project began with my Raspberry Pi still in the shipping packaging. Along with my Pi I ordered a red plastic case and a USB Wall Power Adapter. The red plastic case is large and goofy looking. The case is held together with four posts that insert into four holes. Upon opening it, I broke one of the posts. The Pi snaps into the case — no screws required. The USB Wall Power Adapter requires a micro USB cable that it did not come with and I did not have. My dad needed one too and ordered two cables. With power attached, the Raspberry Pi fired right up.

02. Install RetroPie

To install RetroPie, I needed an SD card. From what I have read on the web, Raspberry Pies are apparently somewhat finicky when it comes to hardware compatibility, but I used the SD card out of my digital camera and it seemed to work.

I searched Google and found the following website: http://supernintendopi.wordpress.com. That website contains an entire set of instructions that will get RetroPie up and running on your Pi.

The first four or five commands took a minute or so to type in and process. The next command was the one that would download and update all the emulators and I was warned “would take about 9 hours to run.” With my 20 Mbit cable connection it took closer to 12 hours.

03. Play some games!

The final step was to reboot the Pi, go through the menu system, do some tweaking and play some games!

The initial elation I got from seeing this screen quickly faded after I was dumped out to a command prompt. While I didn’t get much time to troubleshoot before heading out of town this week, I think the SD card might have filled up. (I used a 4gb card when an 8gb card was recommended.) I’ll do some basic troubleshooting when I get home, but if it’s nothing obvious I may have to acquire an 8gb SD card and try again.

I guess the positive outcome here is that the Pi works. It fired up, got an IP address, and went nuts when I typed in update commands. That’s good. The takeaway is that I need more Linux knowledge to be able to do more troubleshooting on the Pi. Sounds like some more reading is in order.

A Slice of Raspberry Pi

I suspect the vast majority of my readers either (a) already know what a Raspberry Pi is or (b) don’t know and wouldn’t care. I’m writing this on the slim chance that a third group exists, a group of people who might be interested in the Raspberry Pi but haven’t looked into them yet. So maybe you’ll be one of the lucky ones.

The Raspberry Pi is an ARM-based computer that’s about the size of a credit card (you can tell how small it is in the picture above), which makes it perfect for “projects”. Because it’s ARM-based it runs Linux and not Windows. There are “A” and “B” boards: both come with two USB ports, HDMI out, composite video out, audio out, a network jack, an expansion port, and use SD cards for storage. The A sells for $25 and comes with 256 megabytes of RAM. The B sells for $10 more and has 512 meg.

In the earliest days of home computing, people didn’t ask “what does this computer do?” but rather “what can I do with this computer?” There’s a difference … a big one. Those days were all about coming up with creative uses for computers and using computers to solve problems.

By searching Google for uses for Raspberry Pi you can find all kinds of things people have come up with. The most mainstream (read: “computer-like”) uses include using them for media streaming devices (the build-in HDMI port outputs video in 1080p) and as lot-to-medium end living room PCs (they make great emulation boxes apparently).

Dig around a bit further and you’ll find where people are using them for home automation. And running security systems. And controlling motors and robots. And coffee makers. And baby monitors. And a robot that decorates Easter eggs. You can find some more creative uses for the Pi with this Google search,
Creative uses for Raspberry Pi
.

I used to find computers very magical and exciting. Now they’re a tool that I use at work and at home. I don’t “play” with them hardly at all, anymore. I bought two Raspberry Pis, one for me and one for my Dad. I’m hoping that we can get some projects up and running on these and make computing fun again.